 800-4-SEATOW
 Service Locator
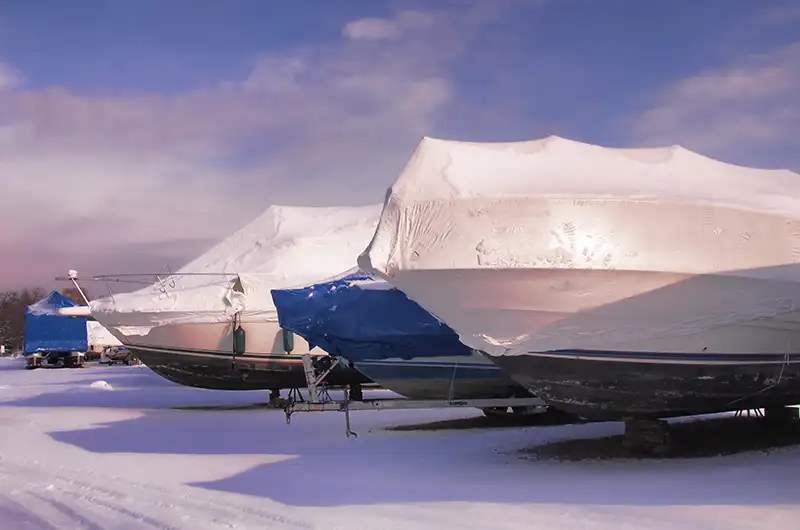
Storing your boat for the winter comes down to three essentials: choose the right location, keep every nook bone-dry, and protect vulnerable systems before freezing temps set in. Whether you park the boat on a backyard trailer or rent a heated dry-stack slot, a few hours of winterization care now will save you thousands in time and money come spring.
The guide below walks you through everything – selecting storage, step-by-step winterization, common mistakes, and the fastest way to de-winterize when the ice finally melts.
Why Winter Storage Matters
America’s 11.5 million registered recreational boats face the same off-season enemy – moisture that turns to ice, expands, and breaks things in hidden places. Even a thumbnail-size puddle inside a scupper can split fiberglass when it freezes.
The chain reaction of freeze damage
Water expands about nine percent as it turns to ice. That pressure can:
- Crack engine blocks and risers
- Delaminate decks and transoms
- Split hull gelcoat and ruin paint
A single cracked manifold often costs more to replace than an entire season’s worth of covered dry-stack storage.
Choose the Best Storage Location
In-water slips (mild climates or bubbler-equipped marinas)
Keeping the boat in the water saves hauling fees, but you’ll need full winterization plus an agitator to stop ice from forming around the hull. Lose shore power and you risk hull or dock damage.
Dry outdoor storage (most popular, lowest cost)
A fenced yard or your own driveway offers affordability and easy access. Budget $20–$50 per foot, wrap the boat, and check regularly to shake off snow.
Indoor storage or heated dry stack
The gold standard. Boats sit on racks in a warehouse, fully protected from weather. Expect $50–$200 per foot, and bonus, you won’t need a separate summer slip if the rack crew launches for you.
Five Core Principles of Safe Winter Storage
Pick the right spot
Secure ground, drainage away from the keel, and permission from local codes or HOAs.
Keep the boat dry
Moisture plus cold equals damage. Seal scuppers, clear leaves, and install a tight, vented cover – shrink-wrap if you can.
Shelter from wind
Tie covers with proper straps and use sandbags or weighted milk jugs as anchors. A tarp that turns into a sail can create a hazard for every boat nearby.
Remove what you can
Cushions, life jackets, dock lines, and electronics fare better in a dry garage. Wash lines and trickle-charge the battery indoors.
Be proactive all winter
Storage is not “set and forget.” Check on the boat after every heavy snow or wind event to spot ripped covers, critter nests, or pooling water early.
Step-by-Step Winterization Checklist
Drain and dry everything
Run the bilge pump, open seacocks, raise the bow for drainage, then sponge the last puddles by hand.
Flush and protect the engine
- Fresh-water rinse to remove salt and silt.
- Replace raw water with marine-grade antifreeze rated below your coldest expected temperature.
- Warm the engine, then change oil and filters while contaminants are suspended. Milky oil means water intrusion – fix before storage.
- Fog carburetors and cylinders with fogging oil.
Stabilize the fuel
Top the tank to 95 percent and add ethanol-compatible stabilizer. Run the engine for 15 minutes to circulate.
Lubricate and loosen
Grease steering tubes, control cables, hinges, and latches. Remove drive belts or at least relieve tension to prevent cracks.
Charge and store the battery
Fully charge, grease terminals, and keep it on a smart trickle charger in a frost-free space.
Clean and wax
Scrub hull, decks, lockers, and bilge with boat soap; let everything dry; then apply wax to seal gelcoat against oxidation.
Cover correctly
Build a support frame so snow slides off, vent the cover to prevent mildew, and leave access zippers for mid-winter checks.
Special Considerations for Outdoor Storage
Rafts and inflatables
Coat the entire surface – valves included – with UV protectant such as 303 before wrapping.
Drift boats and hard hulls
Add a kickstand or cradle so any meltwater flows out the drain plug. Insert wire mesh to keep rodents from climbing inside.
Trailer tips
Inflate tires to max rated PSI, chock wheels, and grease hubs. Block under the frame – not the axle – to relieve tire load. Repack bearings in the spring.
Common Winterization Mistakes to Avoid
Leaving water in raw-water side of the engine
It only takes one cold snap to crack a block.
Ignoring the fuel vent
A clogged vent plus a hot-cold cycle can collapse a portable tank or starve the engine on launch day.
Forgetting the cover frame
Snow load can turn a cheap tarp into a swimming pool over the cockpit.
Storing batteries on bare concrete
Old myth or not, concrete wicks moisture and encourages self-discharge.
Skipping mid-winter inspections
Covers rip, mice chew wires, and branch-punctured shrink-wrap floods bilges.
De-winterizing: Fast Track to Spring Launch
- Remove covers early on a sunny day to air out.
- Inspect for freeze lines – look for dried antifreeze traces or lifted gelcoat blisters.
- Reinstall batteries; check voltage is ≥12.6 V.
- Flush antifreeze from cooling circuits; verify raw-water flow at idle.
- Top fluids and pressure-test fuel lines.
- Wax touch-ups on any scuffs.
- Safety check: flares, PFDs, fire extinguishers, nav lights.
Final Thoughts
Winter may feel like a long season ahead, but a boat stored right now is a boat ready to play the minute the ice breaks. Pick smart storage, chase every drop of water out of the hull, shield her from wind and sun, and stay engaged all season. Your reward is a faster, cheaper, trouble-free return to the water – and more Saturdays spent making wake instead of waiting on parts.

Sea Tow Team
Sea Tow has been the premier leader in on-water boating assistance since 1983. We want to share news, press, tips and all things boating.